Screenshots - Linksys - WCG200-CC (Comcast Firmware)

Linksys - WCG200-CC (Comcast Firmware)


Screenshot Database

Some screenshots have small distortions that were used to blur out personal info such as IP addresses and usernames.
(Click on a picture to view its full size.)


Main

Feature Setup

Feature Setup - Wireless Setup

Feature Setup - Change Gateway Password

Feature Setup - Port Forwarding

Feature Setup - Gateway Status

Feature Setup - DMZ

Feature Setup - Internet Access Time Limit

Technician Setup

Screenshots - ZyXEL - P-660R-T1 (ZyXEL Firmware)

ZyXEL - P-660R-T1 (ZyXEL Firmware)


Screenshot Database

Some screenshots have small distortions that were used to blur out personal info such as IP addresses and usernames.
(Click on a picture to view its full size.)


Login

Change Password

Site Map

LAN Setup

WAN Setup

WAN Functions

WAN Backup Setup

NAT - Mode

NAT - Edit SUA/NAT

Internet Security

Dynamic DNS

Time and Date

Remote Management Control

UpnP
 

Port Forwarding - ZyXEL Routers/Modems

If your router is not listed on this site or in the programs I can add them!
By adding your router I can create all the guides, screenshot databases and have your router work in my programs.
All you need to do is use my easy to use router screen capture program. This will make getting me the data easy and simple.
For more info click here.
Router Screen Capture


------------------------ Current Routers: ------------------------

ZyXEL - Generic Guide 1 (All Models)

What is the Generic Guide?
A lot of the routers use the same or very similar pages.
So if your router isn't listed, then the generic guide may help.

ZyXEL - MAX-210M1 (ZyXEL Firmware)
ZyXEL - NBG318S (ZyXEL Firmware)
ZyXEL - NBG334W (ZyXEL Firmware)
ZyXEL - NBG419N (ZyXEL Firmware)
ZyXEL - NBG420N (ZyXEL Firmware)
ZyXEL - P-2602HL-D1A (ZyXEL Firmware)
ZyXEL - P-2602HW-D1A (ZyXEL Firmware)
ZyXEL - P-2602R-D1A (ZyXEL Firmware)
ZyXEL - P-2802HWL-I1 (ZyXEL Firmware)
ZyXEL - P-320W (ZyXEL Firmware)
ZyXEL - P-330W EE (ZyXEL Firmware)
ZyXEL - P-334U (ZyXEL Firmware)
ZyXEL - P-335 (ZyXEL Firmware)
ZyXEL - P-660H-D1 (ZyXEL Firmware)
ZyXEL - P-660HN-F1Z (ZyXEL Firmware)
ZyXEL - P-660HN-T1H (ZyXEL Firmware)
ZyXEL - P-660H-T1 v2 (ZyXEL Firmware)
ZyXEL - P660HT2 EE (ZyXEL Firmware)
ZyXEL - P660HTW2 (ZyXEL Firmware)
ZyXEL - P-660HW-D1 v2 (ZyXEL Firmware)
ZyXEL - P-660HW-D3 (ZyXEL Firmware)
ZyXEL - P-660HW-T1 v2 (ZyXEL Firmware)
ZyXEL - P-660HW-T1 v3 (ZyXEL Firmware)
ZyXEL - P660HW-T3 v2 (ZyXEL Firmware)
ZyXEL - P-660R-61C (ZyXEL Firmware)
ZyXEL - P-660R-D1 (ZyXEL Firmware)
ZyXEL - P-660R-T1 (ZyXEL Firmware)
ZyXEL - P-660R-T1 v2 (ZyXEL Firmware)
ZyXEL - P660RT2 (ZyXEL Firmware)
ZyXEL - P660RU2 EE (ZyXEL Firmware)
ZyXEL - P-660W-T1 v2 (ZyXEL Firmware)
ZyXEL - P-661H-D1 (ZyXEL Firmware)
ZyXEL - P-662HW-D1 (ZyXEL Firmware)
ZyXEL - Prestige 623ME-T1 (ZyXEL Firmware)
ZyXEL - Prestige 2602H-61 (ZyXEL Firmware)
ZyXEL - Prestige 2602HW-61 (ZyXEL Firmware)
ZyXEL - Prestige 2602R-61 (ZyXEL Firmware)
ZyXEL - Prestige 650H-E1 (ZyXEL Firmware)
ZyXEL - Prestige 650HW-31 (ZyXEL Firmware)
ZyXEL - Prestige 650R-33 (ZyXEL Firmware)
ZyXEL - Prestige 660H-61 (ZyXEL Firmware)
ZyXEL - SP-660 (ZyXEL Firmware)
ZyXEL - ZyWALL 10W (ZyXEL Firmware)
ZyXEL - ZyWALL 2WG (ZyXEL Firmware)

Port Forwarding - ZyXEL - P-660R-T1 (ZyXEL Firmware)

ZyXEL - P-660R-T1 (ZyXEL Firmware)
 
Port Forwarding Guide
For automatic port forwarding try Simple Port Forwarding

Step 1.

Some routers & modems work best with port forwarding if you have a static local IP.
Manually set your network interface card ( NIC ) to use a static ip address.
You can also download my FREE Simple Static IP tool to set it for you.

Step 2.

Open your favorite web browser and input your routers ip address in the address bar.
Please note that you must have the http:// in order to connect to your router/modem properly.

Need help finding you router IP address? Click here

Step 3.

Some router/modems require a username and/or password, if yours requires it, enter the routers username and/or password here.

If you have changed it and don't remember it you may have to reset your device to factory default using the reset button on most routers.

Step 4.

Once logged into your router click on "Advanced Setup"

Once the page has loaded click on "NAT"


Click To View Full Picture

Step 5.

In "Start Port" enter the starting port to be forwarded.
Example: 2100

In "End Port" enter the ending port to be forwarded.
Example: 3100

Enter the computers IP address in "IP Address"

Repeat step 5 for any more ports you want to forward.

Click on "Save"

All Done!


Click To View Full Picture

Port Forwarding - U.S. Robotics Routers/Modems

If your router is not listed on this site or in the programs I can add them!
By adding your router I can create all the guides, screenshot databases and have your router work in my programs.
All you need to do is use my easy to use router screen capture program. This will make getting me the data easy and simple.
For more info click here.
Router Screen Capture


------------------------ Current Routers: ------------------------

Port Forwarding - U.S. Robotics - USR9106 (U.S. Robotics Firmware)

U.S. Robotics - USR9106 (U.S. Robotics Firmware)

Port Forwarding Guide
For automatic port forwarding try Simple Port Forwarding

Step 1.

Some routers & modems work best with port forwarding if you have a static local IP.
Manually set your network interface card ( NIC ) to use a static ip address.
You can also download my FREE Simple Static IP tool to set it for you.

Step 2.

Open your favorite web browser and input your routers ip address in the address bar.
Please note that you must have the http:// in order to connect to your router/modem properly.

Need help finding you router IP address? Click here

Step 3.

Some router/modems require a username and/or password, if yours requires it, enter the routers username and password here.

If you have changed it and don't remember it you may have to reset your device to factory default using the reset button on most routers.


Step 4.

Once logged into your router click on "Security"

Once the page has loaded click on "Virtual Servers"

Then click "Add"


Click To View Full Picture

Step 5.

Once the page has loaded select "Custom Server" and give your entry a name.

Enter the computer IP address in "Server IP address"

In "External Port Start" enter the starting port to be forwarded.
Example: 2100

In "External Port End" enter the ending port to be forwarded.
Example: 2100

Next choose the "Protocol" you wish to use

In "Internal Port Start" enter the starting port to be forwarded.
Example: 2100

In "External Port End" enter the ending port to be forwarded.
Example: 2100

Repeat step 5 for any more ports you want to forward.

Click on "Apply"

All Done!

Click To View Full Picture

Port Forwarding - Trendnet Routers/Modems

If your router is not listed on this site or in the programs I can add them!
By adding your router I can create all the guides, screenshot databases and have your router work in my programs.
All you need to do is use my easy to use router screen capture program. This will make getting me the data easy and simple.
For more info click here.
Router Screen Capture


------------------------ Current Routers: ------------------------

Port Forwarding - Trendnet - TEW-632BRP (Trendnet Firmware)

Trendnet - TEW-632BRP (Trendnet Firmware)

Port Forwarding Guide
For automatic port forwarding try Simple Port Forwarding

Step 1.

Some routers & modems work best with port forwarding if you have a static local IP.
Manually set your network interface card ( NIC ) to use a static ip address.
You can also download my FREE Simple Static IP tool to set it for you.

Step 2.

Open your favorite web browser and input your routers ip address in the address bar.
Please note that you must have the http:// in order to connect to your router/modem properly.

Need help finding you router IP address? Click here

Step 3.

Some router/modems require a username and/or password, if yours requires it, enter the routers username and password here.

Then click "Log In"

If you have changed it and don't remember it you may have to reset your device to factory default using the reset button on most routers.


(Click To View Full Picture)

Step 4.

Once logged into your router click on "Access"

Once the page has loaded click on "Virtual Server"


Click To View Full Picture

Step 5.

Once the page has loaded click "Enable"

Give your entry a name in the "Name" field.

Next choose the "Protocol" you wish to use

In "Private Port" enter the starting port to be forwarded.
Example: 2100

In "Public Port" enter the ending port to be forwarded.
Example: 2300

Enter the computer's IP address in "LAN Server"

Click on "Add"

Repeat step 5 for any more ports you want to forward.

All Done!


Click To View Full Picture

Port Forwarding - SMC Routers/Modems

If your router is not listed on this site or in the programs I can add them!
By adding your router I can create all the guides, screenshot databases and have your router work in my programs.
All you need to do is use my easy to use router screen capture program. This will make getting me the data easy and simple.
For more info click here.
Router Screen Capture


------------------------ Current Routers: ------------------------

Port Forwarding - SMC- SMCWBR14S-N2 (SMC Firmware)

SMC - SMCWBR14S-N2 (SMC Firmware)
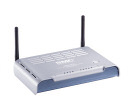
Port Forwarding Guide
For automatic port forwarding try Simple Port Forwarding

Step 1.

Some routers & modems work best with port forwarding if you have a static local IP.
Manually set your network interface card ( NIC ) to use a static ip address.
You can also download my FREE Simple Static IP tool to set it for you.

Step 2.

Open your favorite web browser and input your routers ip address in the address bar.
Please note that you must have the http:// in order to connect to your router/modem properly.

Need help finding you router IP address? Click here

Step 3.

Some router/modems require a username and/or password, if yours requires it, enter the routers username and password here.

Next click "Login"

If you have changed it and don't remember it you may have to reset your device to factory default using the reset button on most routers.
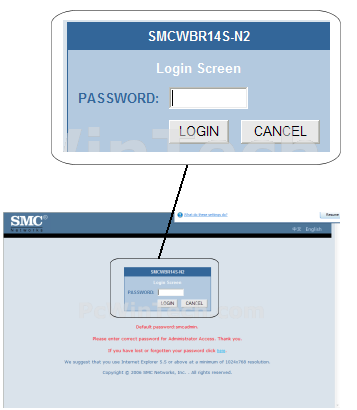

Click To View Full Picture

Step 4.

Once logged into your router click on "NAT"

Once the page has loaded click on "Virtual Server"
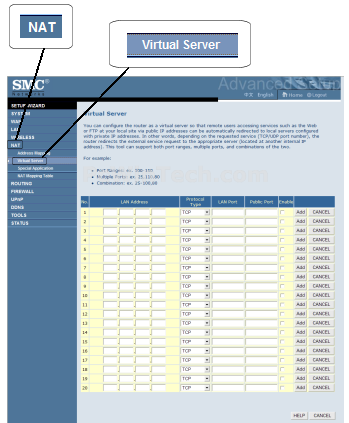

Click To View Full Picture

Step 5.

Enter the computer IP address in "LAN Address"

Next choose the "Protocol Type" you wish to use.

Once the page has loaded check "Enable"

In "LAN Port" enter the starting ports to be forwarded.
Example: 2100 to 3500 or 2100,3600,8300 or a combination of ranges/multiple ports.

In "Public Port" enter the ending ports to be forwarded.
Example: 2100 to 3500 or 2100,3600,8300 or a combination of ranges/multiple ports.

Be sure to check "Enable"

Click on "Add"

Repeat step 5 for any more ports you want to forward.

All Done!
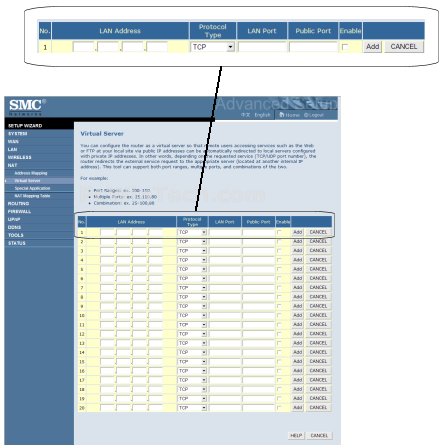

Click To View Full Picture

Pages

Subscribe to PcWinTech.com™ RSS